

Storyboarding Immersive Experiences

We’ve been focusing on storyboarding for linear narratives in XR media and will largely wrap things up in this article. While it applies several concepts introduced in the three previous articles, this article is a pretty good place to start if you’re new.
XR (Extended Reality) is a catch all term that refers to Virtual Reality, Augmented Reality, and Mixed Reality. As well as any other variations.
Storyboards with two types of diagram
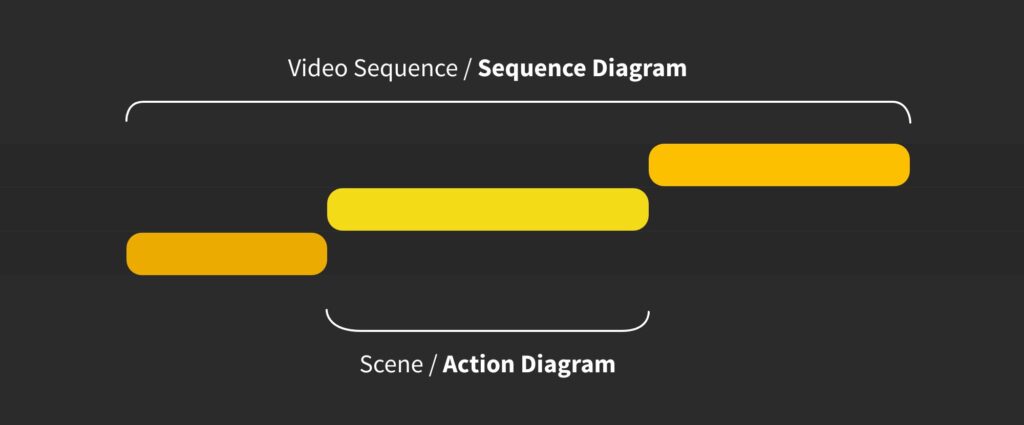
As with previously, the Sequence Diagram and Action Diagram each focus on details that the other one doesn’t in an immersive media storyboard.
The Sequence Diagram (SD) depicts focal point changes at the edits between shots in a sequence. It gives you an overview of how all your shots link together and what that might mean for the viewer’s experience. You can revisit the article about the SD here.
The Action Diagram (AD) lets you describe detailed action within each shot. It shows what happens between the start of the shot and the end of the shot. A level of detail that’s isn’t covered by the Sequence Diagram. You can revisit the article about the AD here.
To use a familiar analogy for video editors, if you think about a video editing timeline, you have an overall sequence and each of the scenes within it. The Sequence Diagram has the same scope as the overall video editing sequence. While the Action Diagram only depicts one or part of an individual scene.
An exception to this might be if the whole sequence is made of multiple camera angles within the same virtual location and continuous scene. In this instance one Action Diagram could represent multiple shots together. It’s very common, but I’ve ignored it above, simply to make the analogy straightforward. We’ll see it again later in this article.

Combining the diagrams
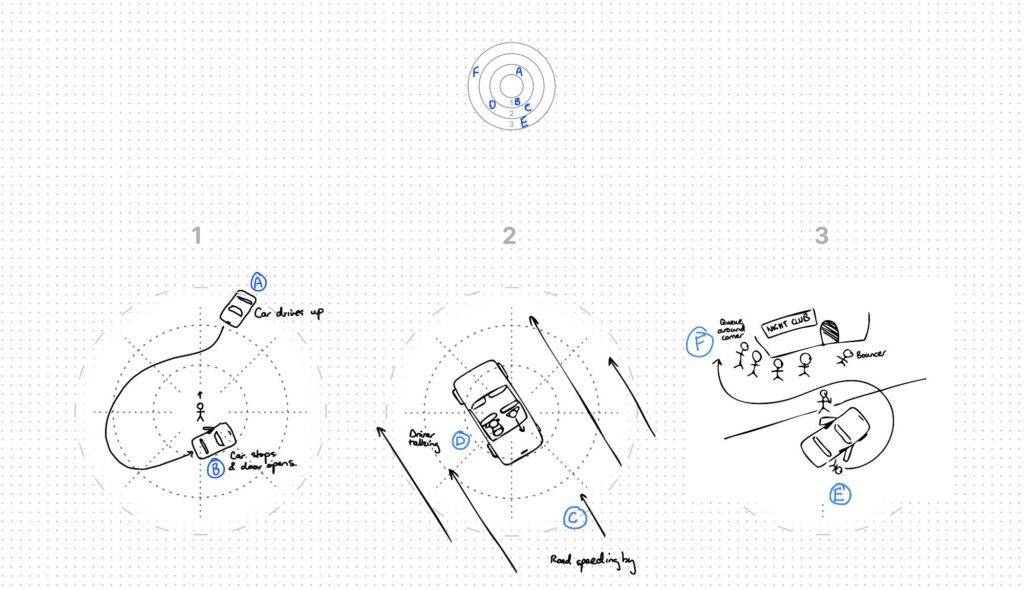
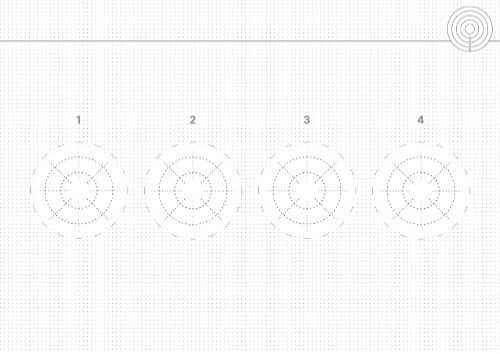
By combining the sequence and action diagrams, we can create a kind of storyboard for XR that more closely approximates the functionality of storyboards for traditional media.
Consistent annotation
Note in the above example that the Action Diagrams (The three scenes) are annotated with the same letters as are on the Sequence Diagram (The rings at the top) to make the link between the two clearer.

Different action diagram scopes
While the sequence diagram is relatively straightforward to use, the Action Diagram doesn’t always match the shots in the sequence one to one. Its scope can vary depending on how much detail is in each scene.
Depicting whole shots
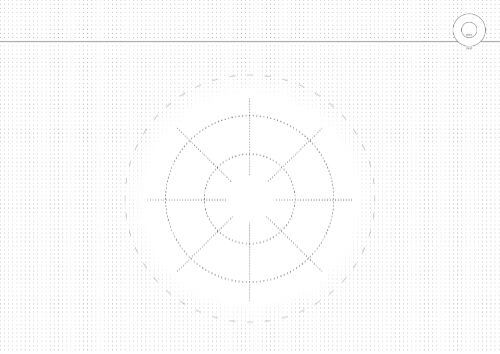
Some shots are simple enough that one Action Diagram can depict all the important details. Let’s start by looking at that more closely.
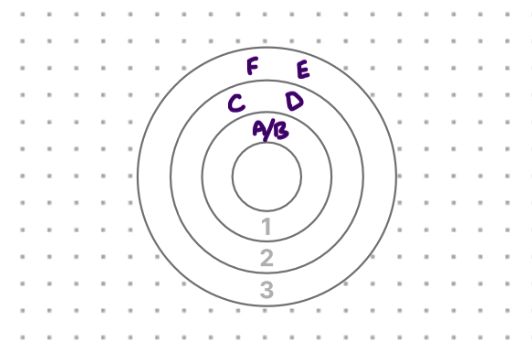
In the example below, the Sequence Diagram shows three scenes (Three rings) but in this instance we’ve only drawn the Action Diagram for the second scene.
In this scene, we can see that the focal point begins in the North direction and ends in the South East. The action between those two points is simple enough that we can depict it all on one Action Diagram with a long arrow and annotations.
Depicting shots in sections
Some scenes, however, are longer and involve multiple action beats. In these instances the action might need to be split over multiple Action Diagrams for a single scene.
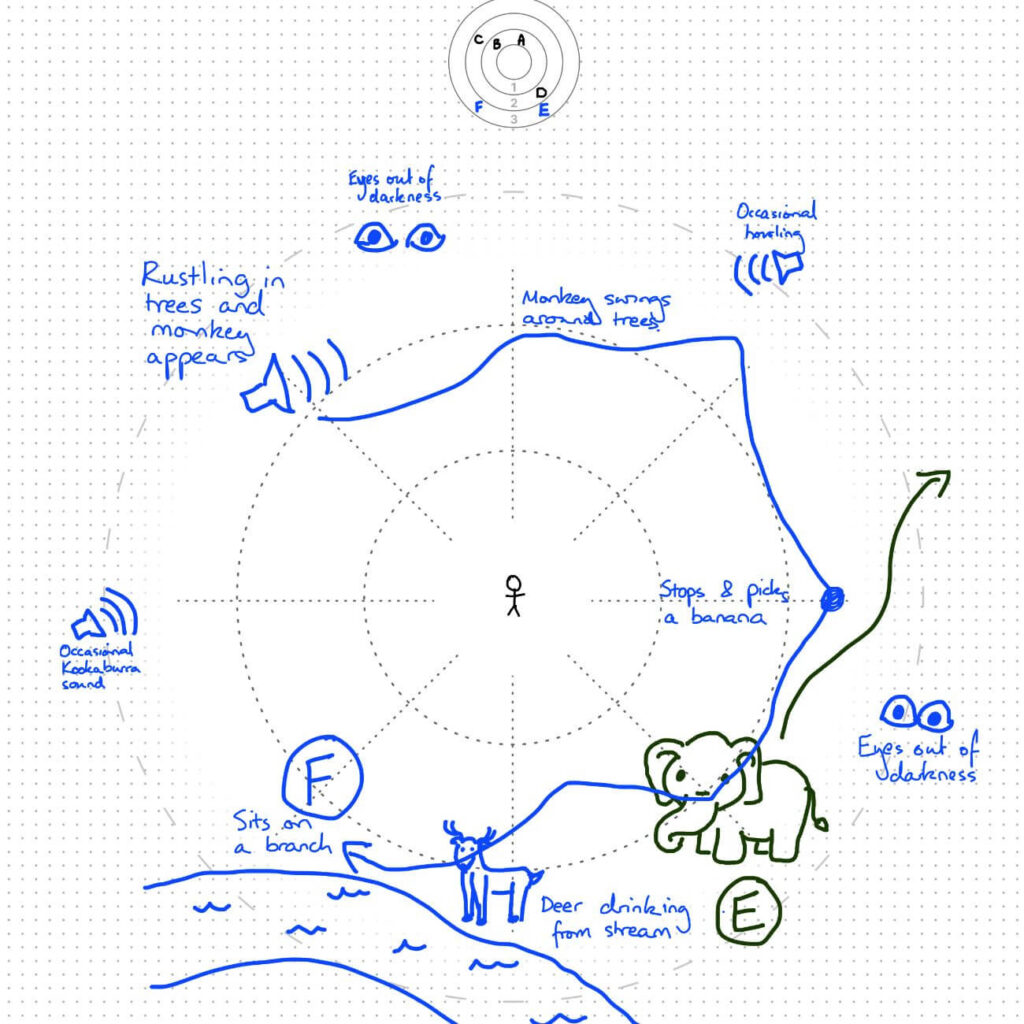
Take scene three below. Which is one ring in the Sequence Diagram (and therefore one shot), but I’ve illustrated it as three separate Action Diagrams.
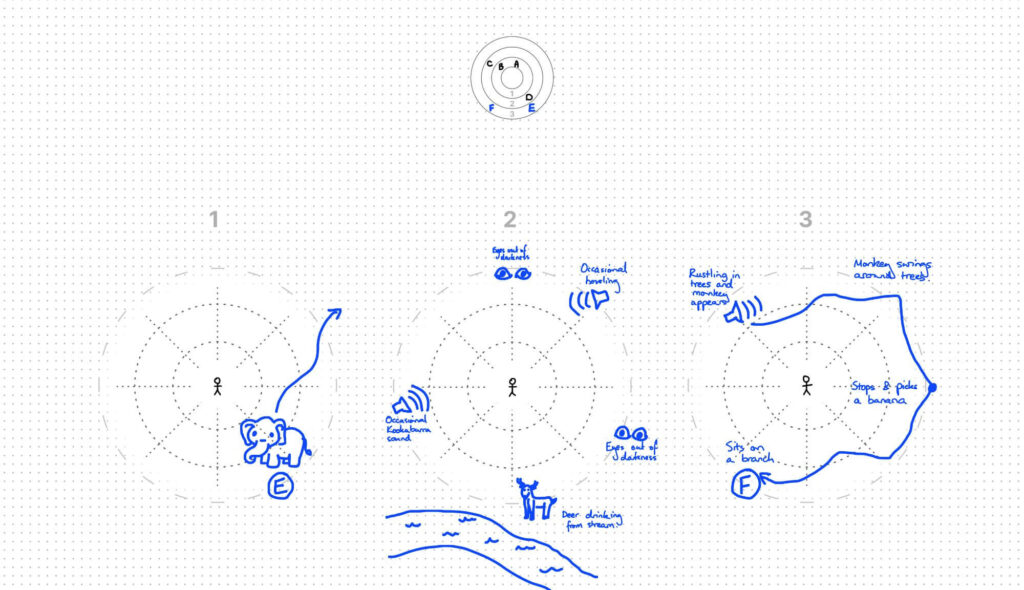
The Sequence Diagram at the top shows the focal point starts at the South East of the diagram (e), and ends up in the South West (F). The Action Diagrams, however, show the viewer starting off facing an elephant (E) which then runs away through the trees and disappears. The viewer is then left exploring the jungle scene with some general points of interest in different directions. A minute later, a monkey starts swinging around the viewer on vines (Focusing their attention again) and then stops in a branch in that final scene position (F).
In this diagram, note the audio icons. Audio is often used to draw the viewer’s attention to an area and is therefore important to articulate in these diagrams as well.
It’s a long and complicated shot, something that is common for XR media. Thus, there is therefore too much detail to cram onto one Action Diagram.
Depicting multiple shots
Similarly, sometimes the action is continuous across multiple shots. This is the de facto standard in traditional media, but it has historically been less common in immersive media. It means the environment doesn’t change between shots, and instead, the viewer is teleported to different perspectives (i.e. A scene with multiple shots).
If we refer to our editing timeline again, we’ll see that we’re now drilling into multiple shots inside the one scene.

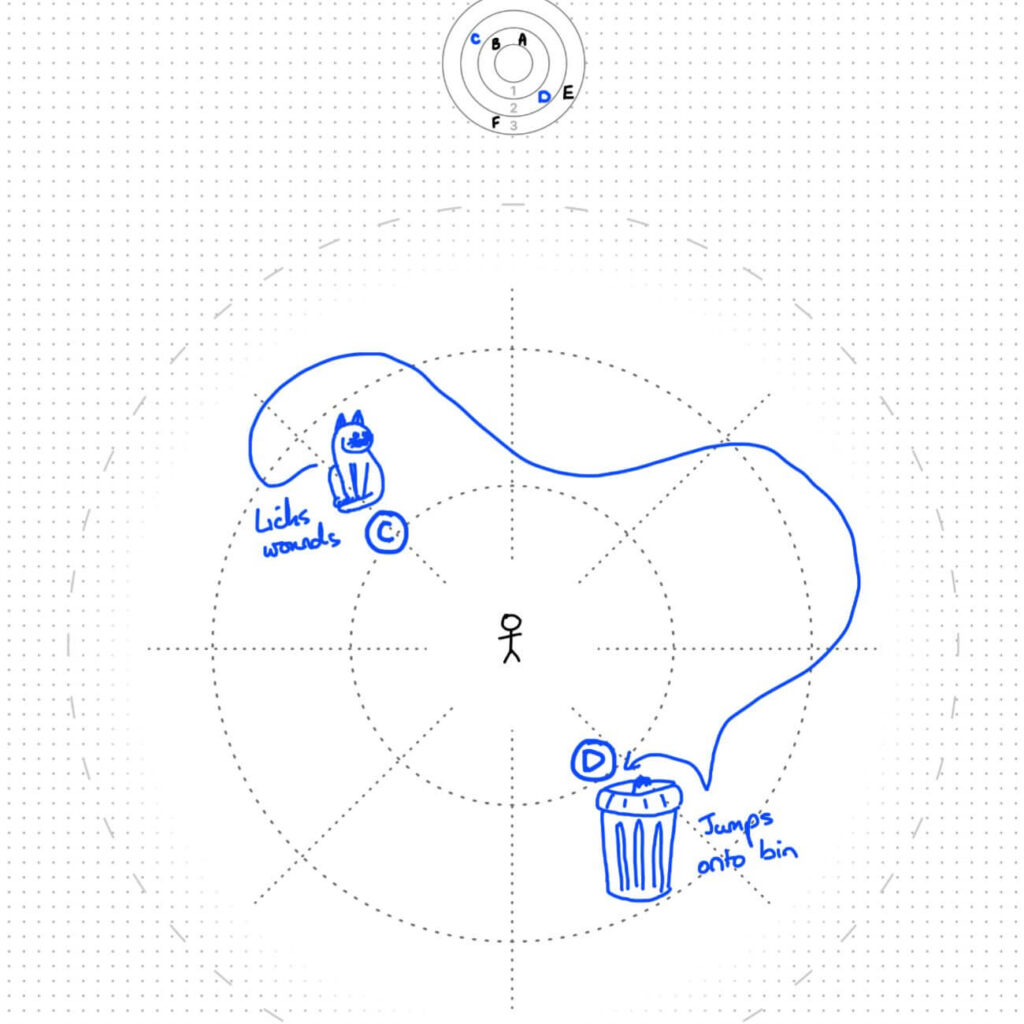
In this instance, the Action Diagram might be used quite differently. Instead of anchoring it’s centre around the viewer, it might anchor on the scene and depict the viewer’s/camera’s various positions within the scene.
In the below example, note how only one Action Diagram is used that includes all the lettering annotations of where the viewer’s focus might be.
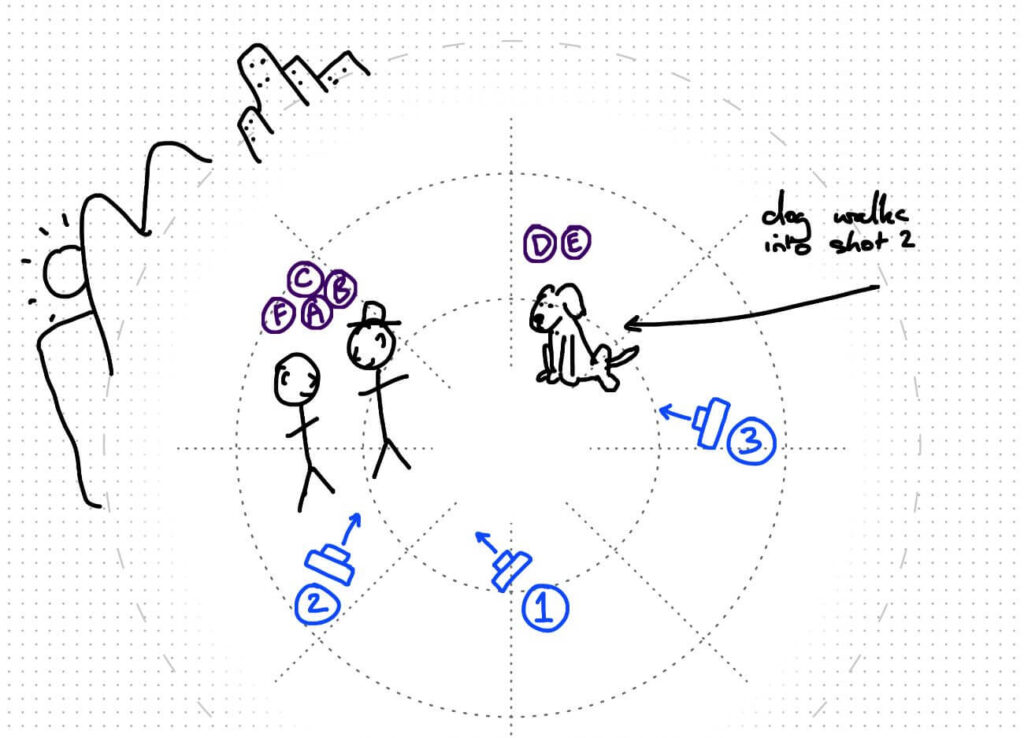
In this type of scene, however, while the Action Diagram is still useful, the Sequence Diagram becomes hard to draw. This is because correctly describing where the start and end focal points are for each shot means mentally (or physically) rotating the action diagram to match the virtual cameras.
Generally, in a single scene with multiple shots like this, the Sequence Diagram starts to break down in its usefulness. But it can also depend slightly on the types of shots.
Static shots
Camera angle changes often occur to follow the action. This means that if there’s not a lot of other movement within the scene, the sequence diagram will likely be a series of focal points in the top middle — And not necessarily worth drawing.
Dynamic shots
In shots with a lot of additional movement, the sequence diagram might show you that your edit asks the viewer to constantly turn in different directions or something similar — Which might make it useful, but it’s also become very complex to both draw and relate to the Action Diagram.
In this kind of multi-shot scene, whether the sequence diagram is useful or not will be subjective.
This kind of sequence starts to push on the limitations of these lo-fi artefacts. If it’s getting this complex, you may find yourself needing to jump onto a computer for 3D visualisation. But I’d love to hear from anyone who’s considered ways of simplifying even the most complex scenes.
Template variations
While developing these diagrams for Swinburne University, we constructed a range of templates that paired the two together in different variations. Three are shown below.
The lines and grid were actually much lighter than seen on this page so that they recede into the background. I’ve increased their contrast for this article though.
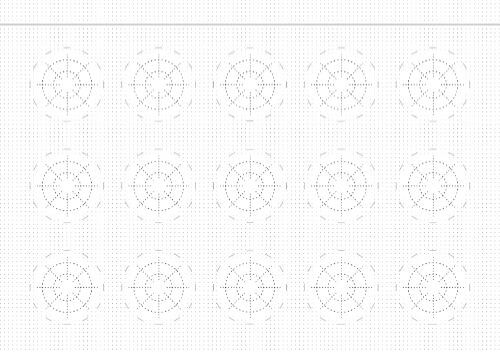
Because these templates were created for a client, I unfortunately can’t share the original high res files here. However, the core artefacts in the diagrams were designed to be easy to draw. Use the techniques described here with just a pencil and a blank sheet of paper or a tablet. Or even create similar templates for yourself.
The rest of the series
This wraps up the focal point blocking techniques in this series. The upcoming articles in the series will focus on wire-framing both the environments and interfaces in more detail. My primary work revolves around product design, so tools for considering interfaces is of special interest to me.
That being said, let’s take a break from this for a few months and return to the series later.
In the meantime, I’d love to see examples of these techniques out in the wild — Whether based on what I’ve described here or completely different techniques. Share your examples on any of the micro-blogging platforms below or on LinkedIn.
And stay tuned for the next article!

Related articles
- 1. Designing Immersive Experiences intros the design frictions in VR, AR, & MR.
- 2. Focal Point Blocking for XR Media Intros the Sequence Diagram as a tool.
- 3. Staging XR Scenes intros the Action Diagram as a tool.
That’s it for now!
Thanks…
I dissect and speculate on design and development.
Digging into subtle details and implications, and exploring broad perspectives and potential paradigm shifts.
Check out more like this on Substack or find my latest articles below.
You can also find me on Threads, Bluesky, Mastodon, or X for more diverse posts about ongoing projects.

My latest articles


Leave a Reply