Focal point blocking for XR media
When building narrative-based virtual reality or mixed reality experiences, linear narratives must carefully consider where they assume the viewer’s attention will be. This can range from encouraging a viewer to look at specific story beats, providing multiple simultaneous beats for them to choose between, or encouraging open exploration instead.
Regardless of how your media plans to engage the viewer, you need to have a way to plan for this and document it efficiently. So you and your team can consider and discuss it together.
In a previous article in this series, I introduce the general complexities of this in-depth, so if you’re new here, I suggest you begin by reading Designing Immersive Experiences. That initial article introduces the primary design considerations that arise when moving from flat, screen-based media like cinema, to more immersive media like virtual reality.
Otherwise, let’s dive in.
Immersive storyboards?
In the previous article, I noted that traditional storyboards can depict focal point movement within a shot, as well as focal point changes between shots. Both are important considerations to ensure the viewer either does or doesn’t get disorientated (Depending on your intention). But we also saw that the more immersive the media, the less suited a standard storyboard becomes — And the more difficult those design considerations become to visualise.
Consider the below first-person depiction of a viewer’s potential experience when viewing a two shot sequence. As well as its top-down equivalent that follows.
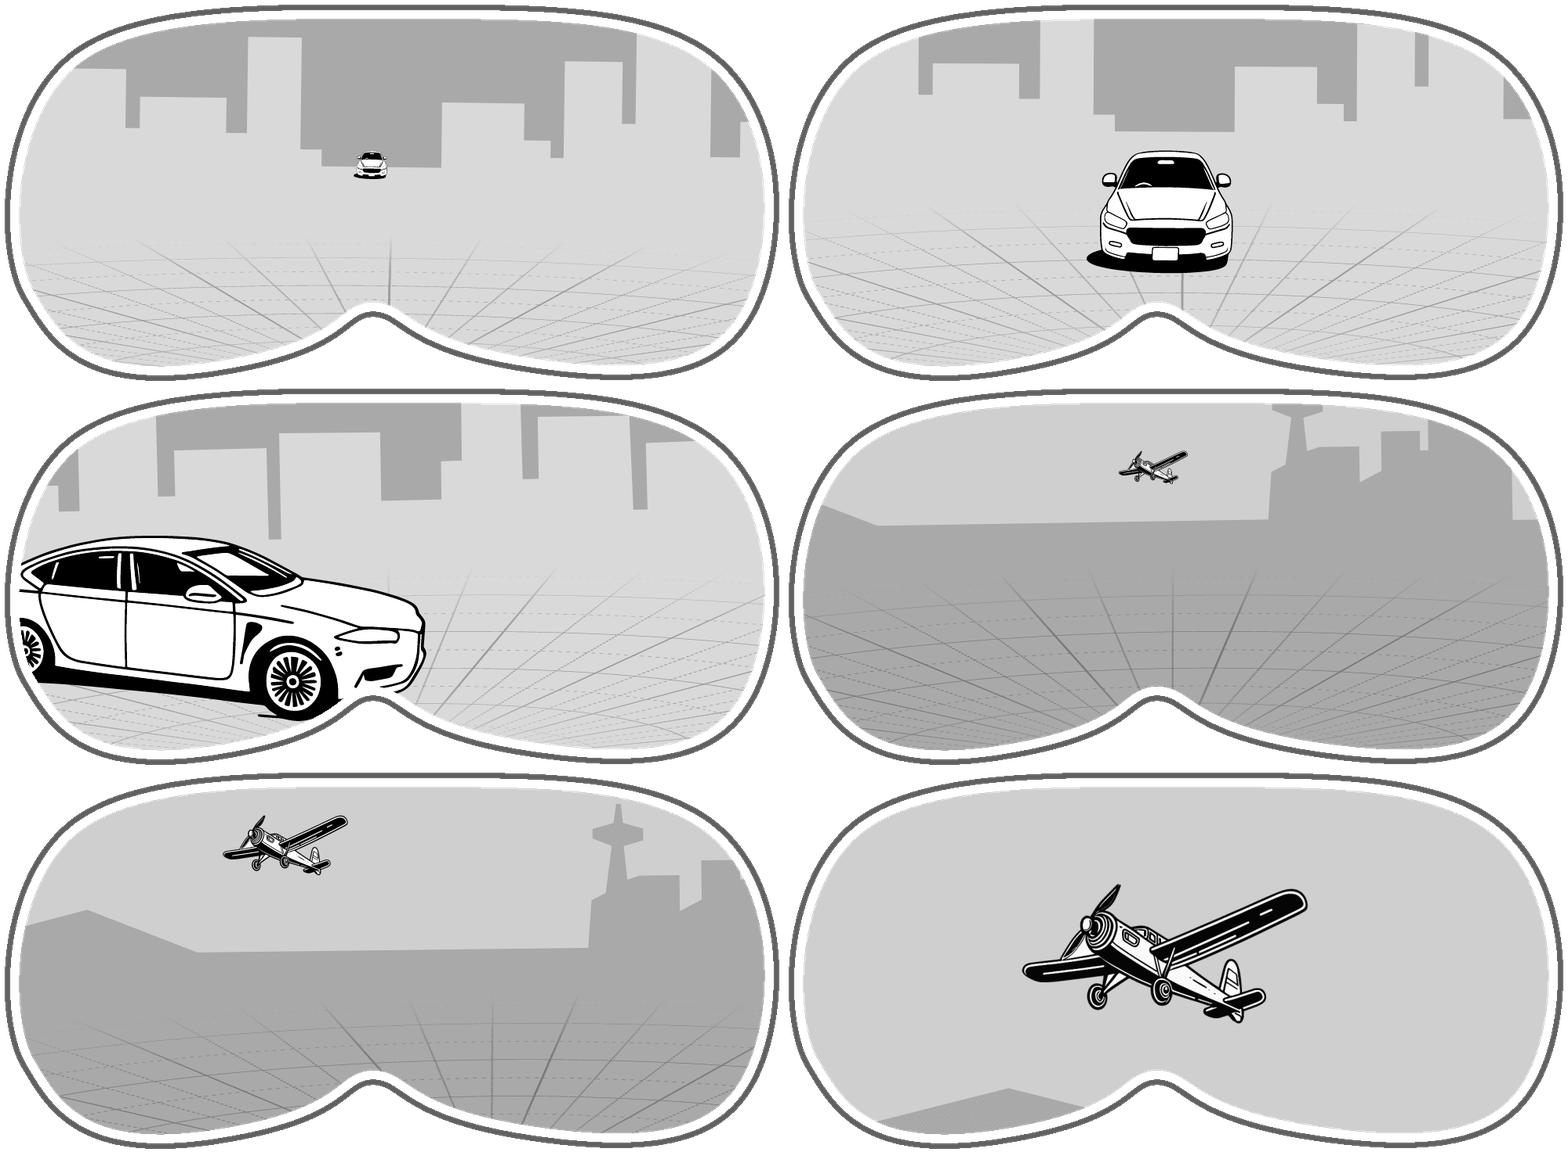
This first-person pre-visualisation (Sometimes referred to as an animatic), is similar to what a standard storyboard might depict. Unlike 2D media, however, there is also about 270 degrees more content around the viewer that they could be looking at — And none of that is shown.
Essentially, the animation only shows a limited set of directions that a viewer might face, and doesn’t give us any information about what’s outside of that.
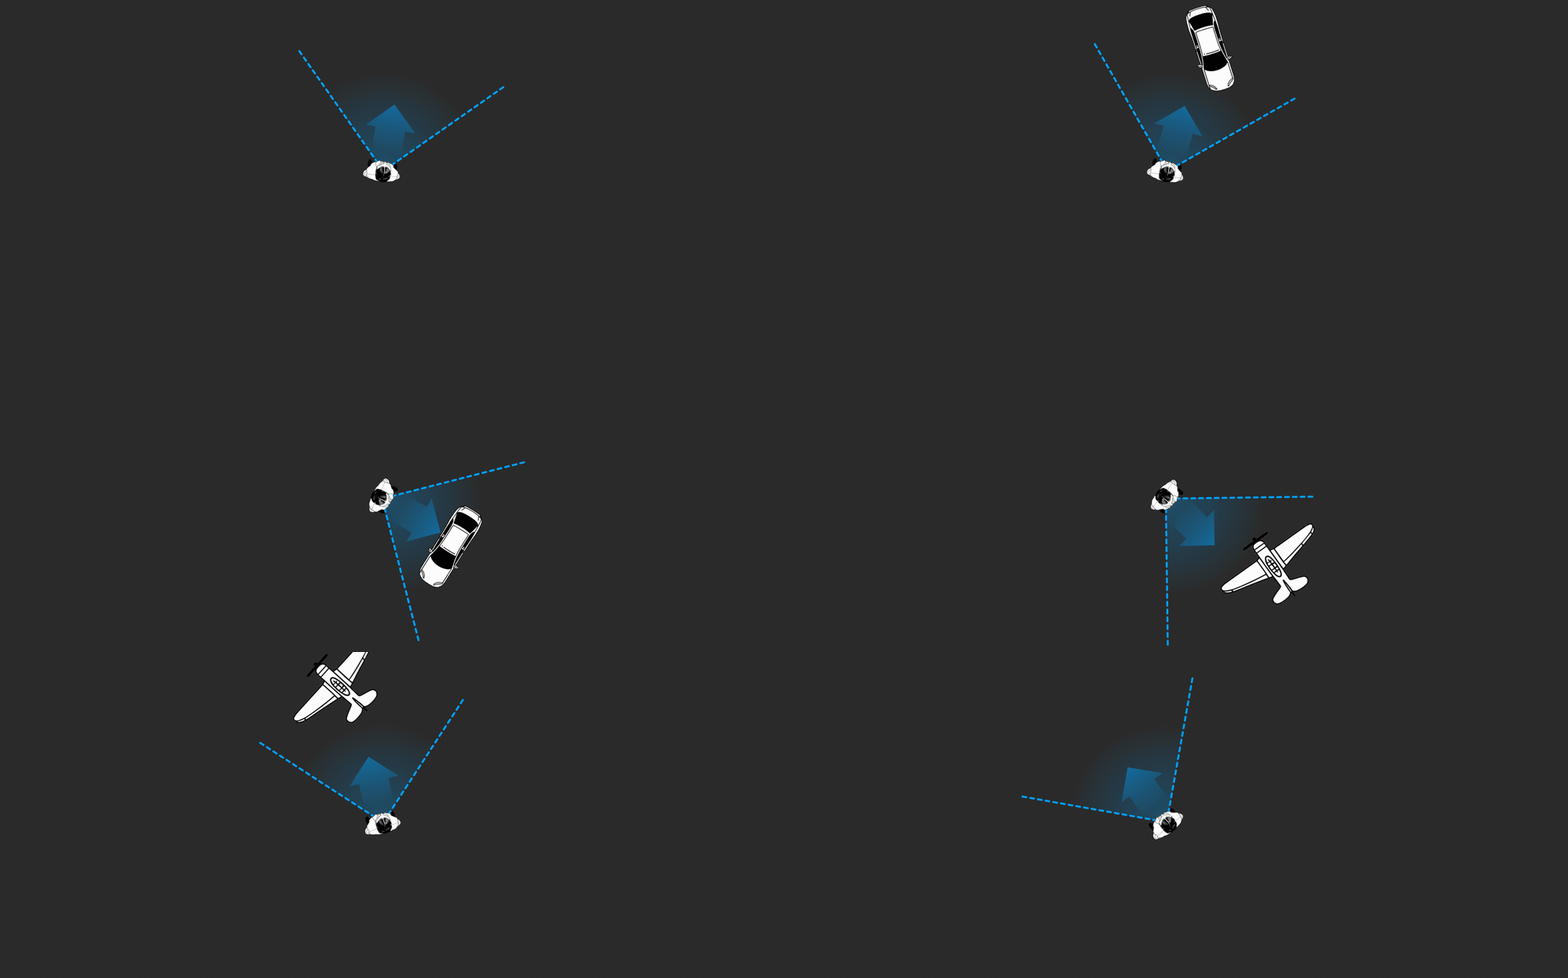
Unlike the first-person perspective, in the top-down depiction, we still see where we want or expect the viewer to look at any given time, but we also gain two new pivotal pieces of information.
- What they would see if they don’t look in the expected direction, and
- How the intended focal points relate to each other across shots.
We also unfortunately lose some information. Specifically, how all of this feels to the viewer from their perspective. Top-down is more helpful, but it’s not the full story.
The problem with hi-fidelity approaches
To solve this, designers can often jump into 3D software straight away. But while this creates very high fidelity and versatile visualisations, it requires expertise and equipment, and it sacrifices the speed and adaptability that early-stage brainstorming often needs.
A cinematographer shouldn’t have to set up a 3D scene on a computer to discuss a potential approach with the director, nor should the director be reliant on a technical artist to depict something that, for 2D mediums, they could have scribbled on a napkin.
While hi-fidelity pre-visualisations have their place, many of our creative thoughts happen away from a computer or VR headset. So we also need more lo-fi and accessible approaches.
The intended experience
While considering the placement of all important objects within the scene is needed at some point, how you want the viewer to feel or behave is a more fundamental starting point that everything else builds on.
To consider this, a director can ditch all detailed visualisation methods (We’ll return to them in subsequent articles), and simply consider how the points of interest relate to each other. Essentially, what is the golden path that the director wants the viewer to follow? And should it present itself clearly to them or should it require some work by the viewer to find?
While I use the phrase golden path here, I’m using it as a metaphor for what they look at. We are still only talking about stationary experiences in which the viewer can look in any direction, they’re not moving around the space.
This can be seen in our car and plane scenes above by taking a few key freeze-frames. We want the viewer to notice the car driving into view and then end up looking to the right where the car stops. This helps ensure that the viewer is facing the correct direction to see the plane in the next shot. Likewise, in the next shot, we want them to notice the plane when it appears and then end up facing the other direction by the end of that shot.
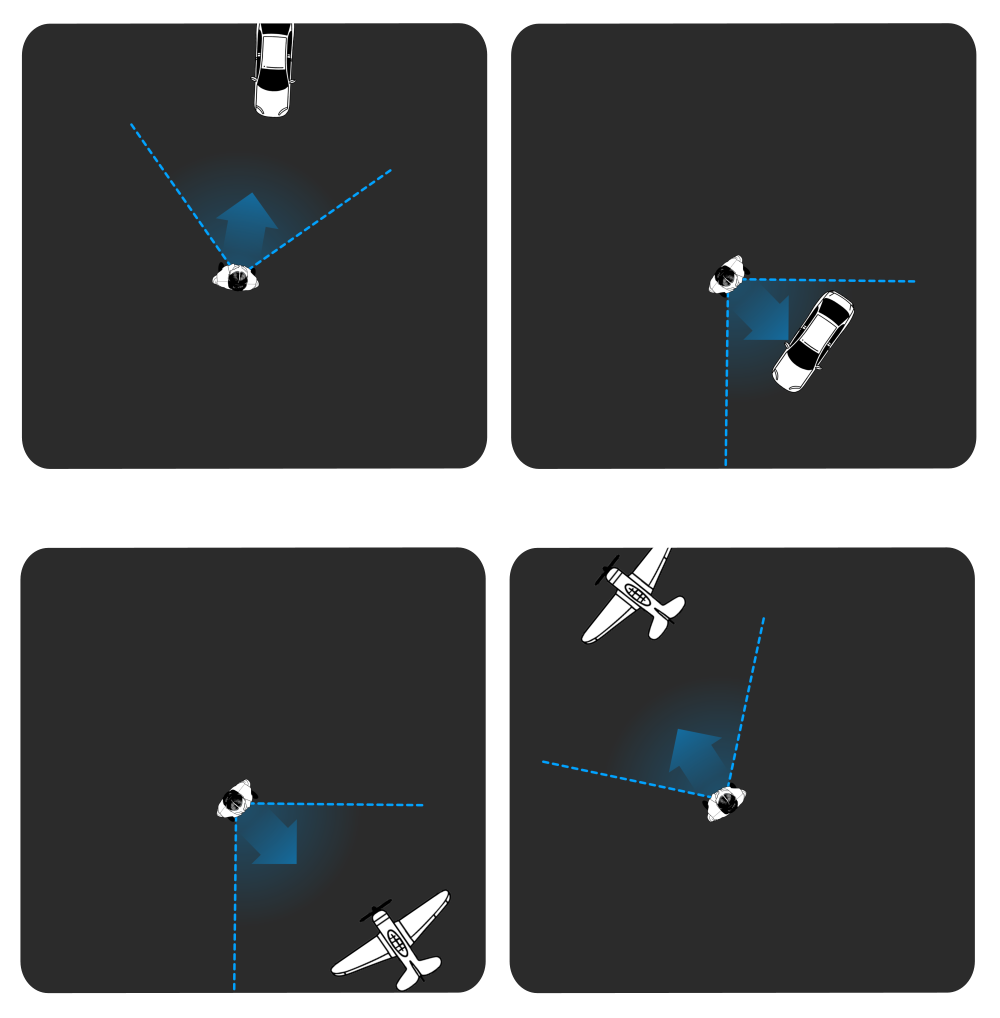
This provides the foundation for how everything else should be designed — Just four simple directions that the viewer should be facing. So why do we have to start with diagrams any more detailed than that?
Jessica Brillhart’s rings
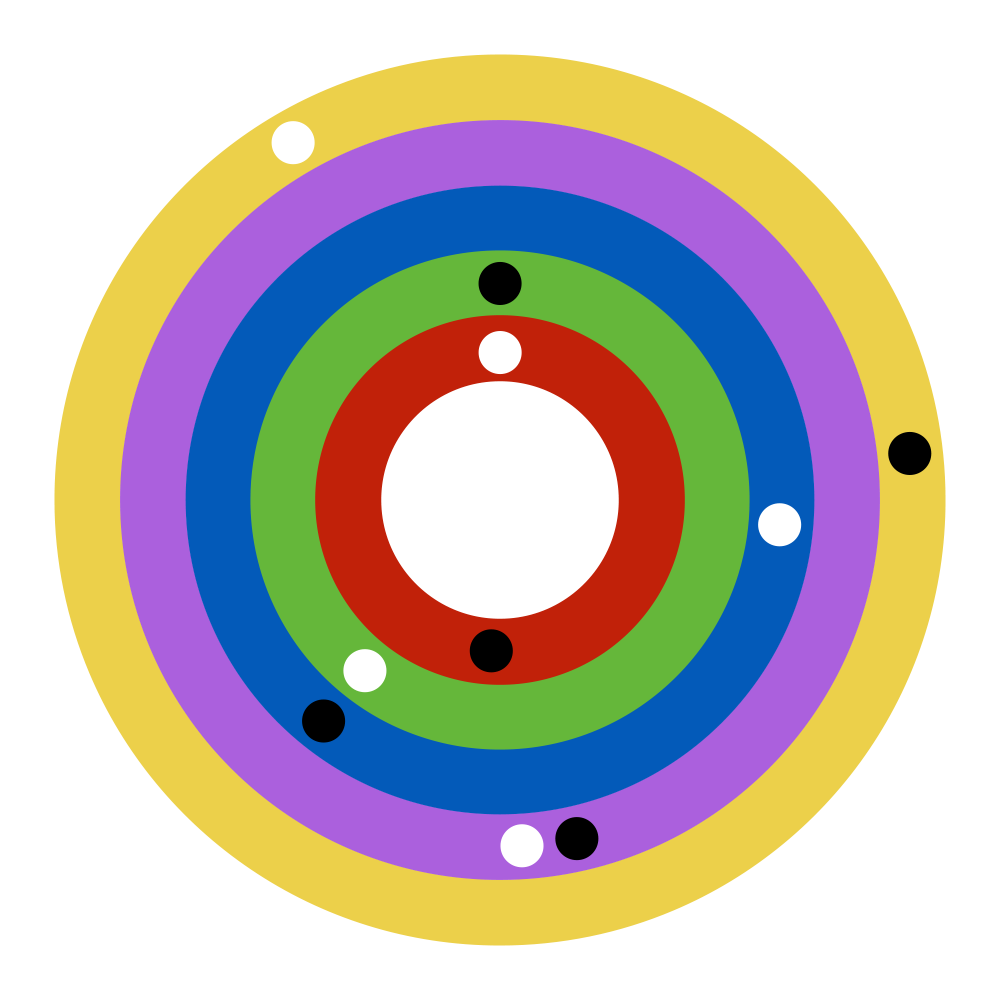
Jessica Brillhart already considered how this kind of focal point blocking could be done for VR in 2016. So let’s start there. In Brillhart’s work, she used rings to depict the focal points relative to the viewer at the centre.
On first viewing, how to read it won’t entirely be self-evident, so I’ll break it down below…
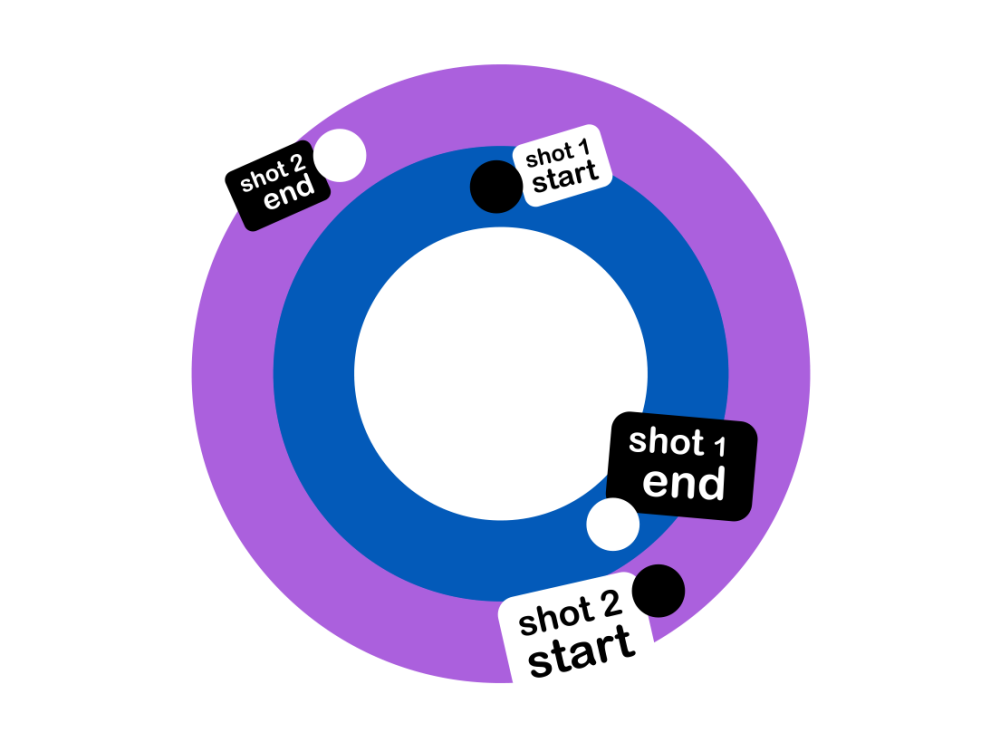
In Brillhart’s approach, one ring represented one scene in the sequence, but let’s think of it as one camera shot in the sequence. In that ring we are depicting where the focal point is at the start of the shot, and where it is at the end of the shot.
Adapting our car example from earlier would result in the below ring. Note that the dots don’t indicate the proximity of the car to the viewer nor the height of the car, but simply, which direction the viewer would have to face to see it.
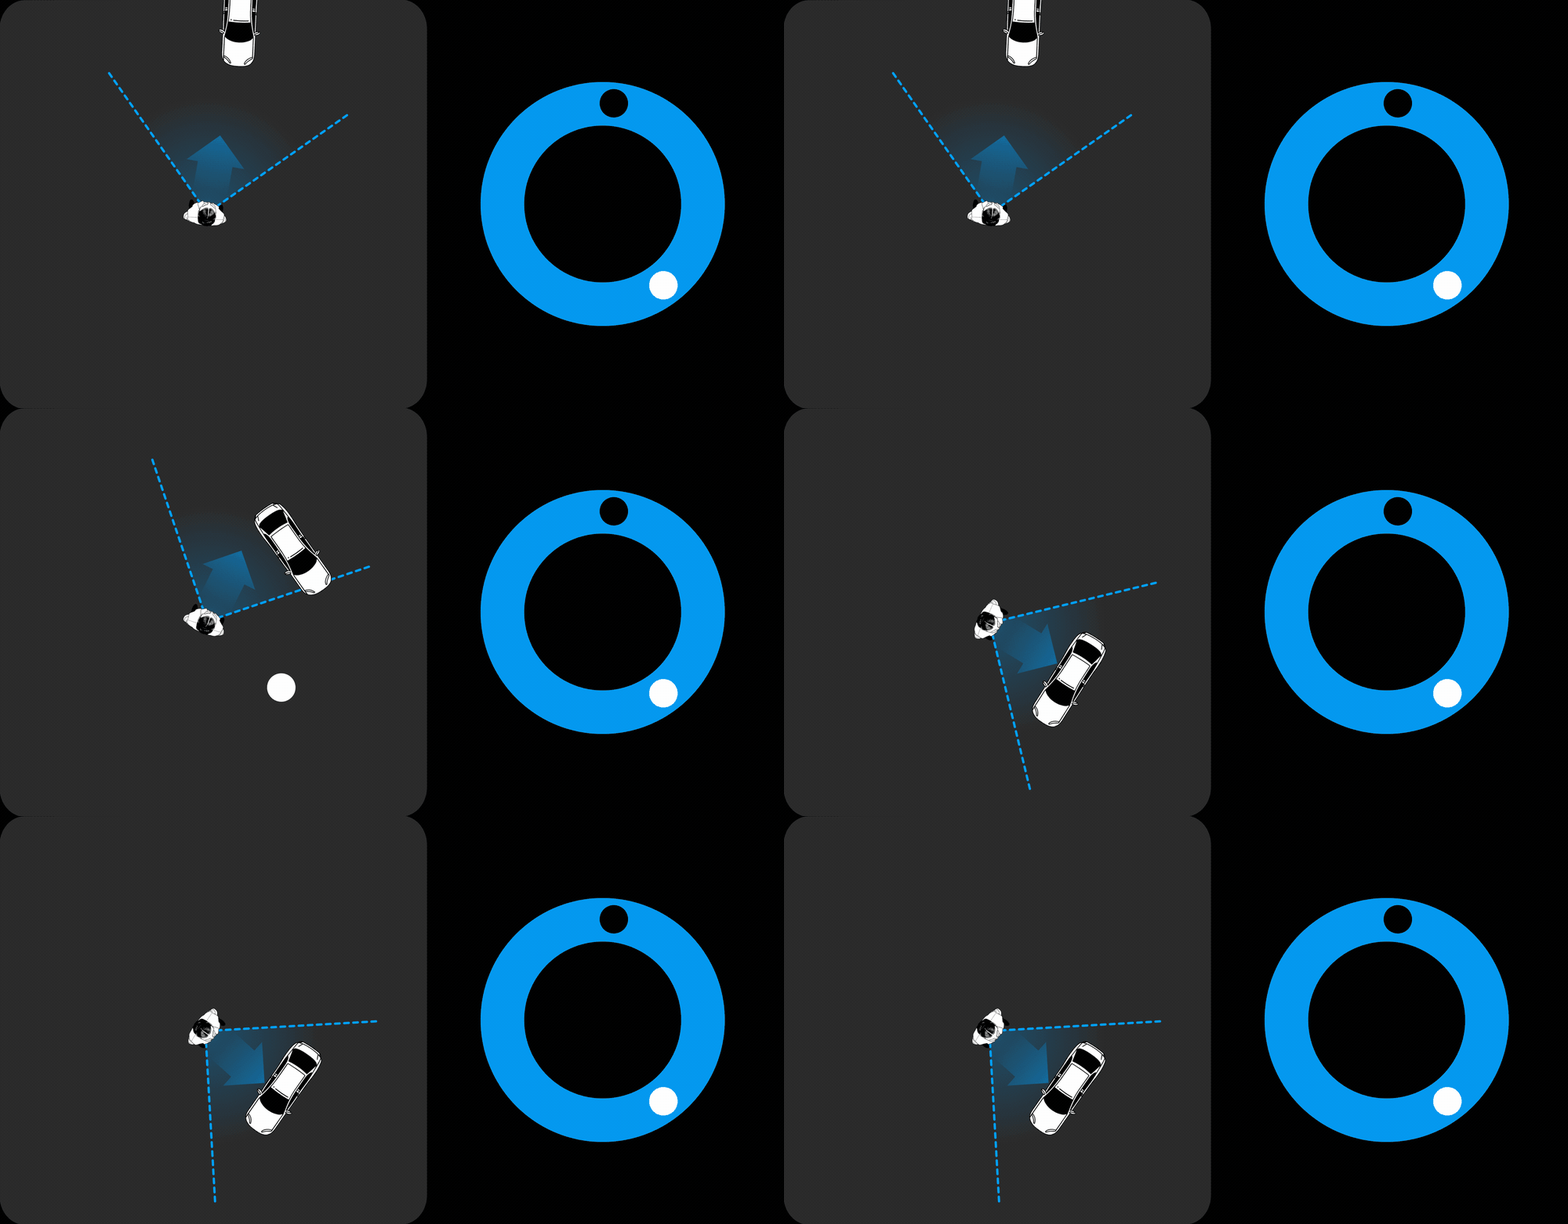
This 2D representation becomes useful, though, once we consider multiple shots in succession. To do so, we add an additional ring to represent the second shot. The inner ring is the first shot and the outer ring is the last shot.
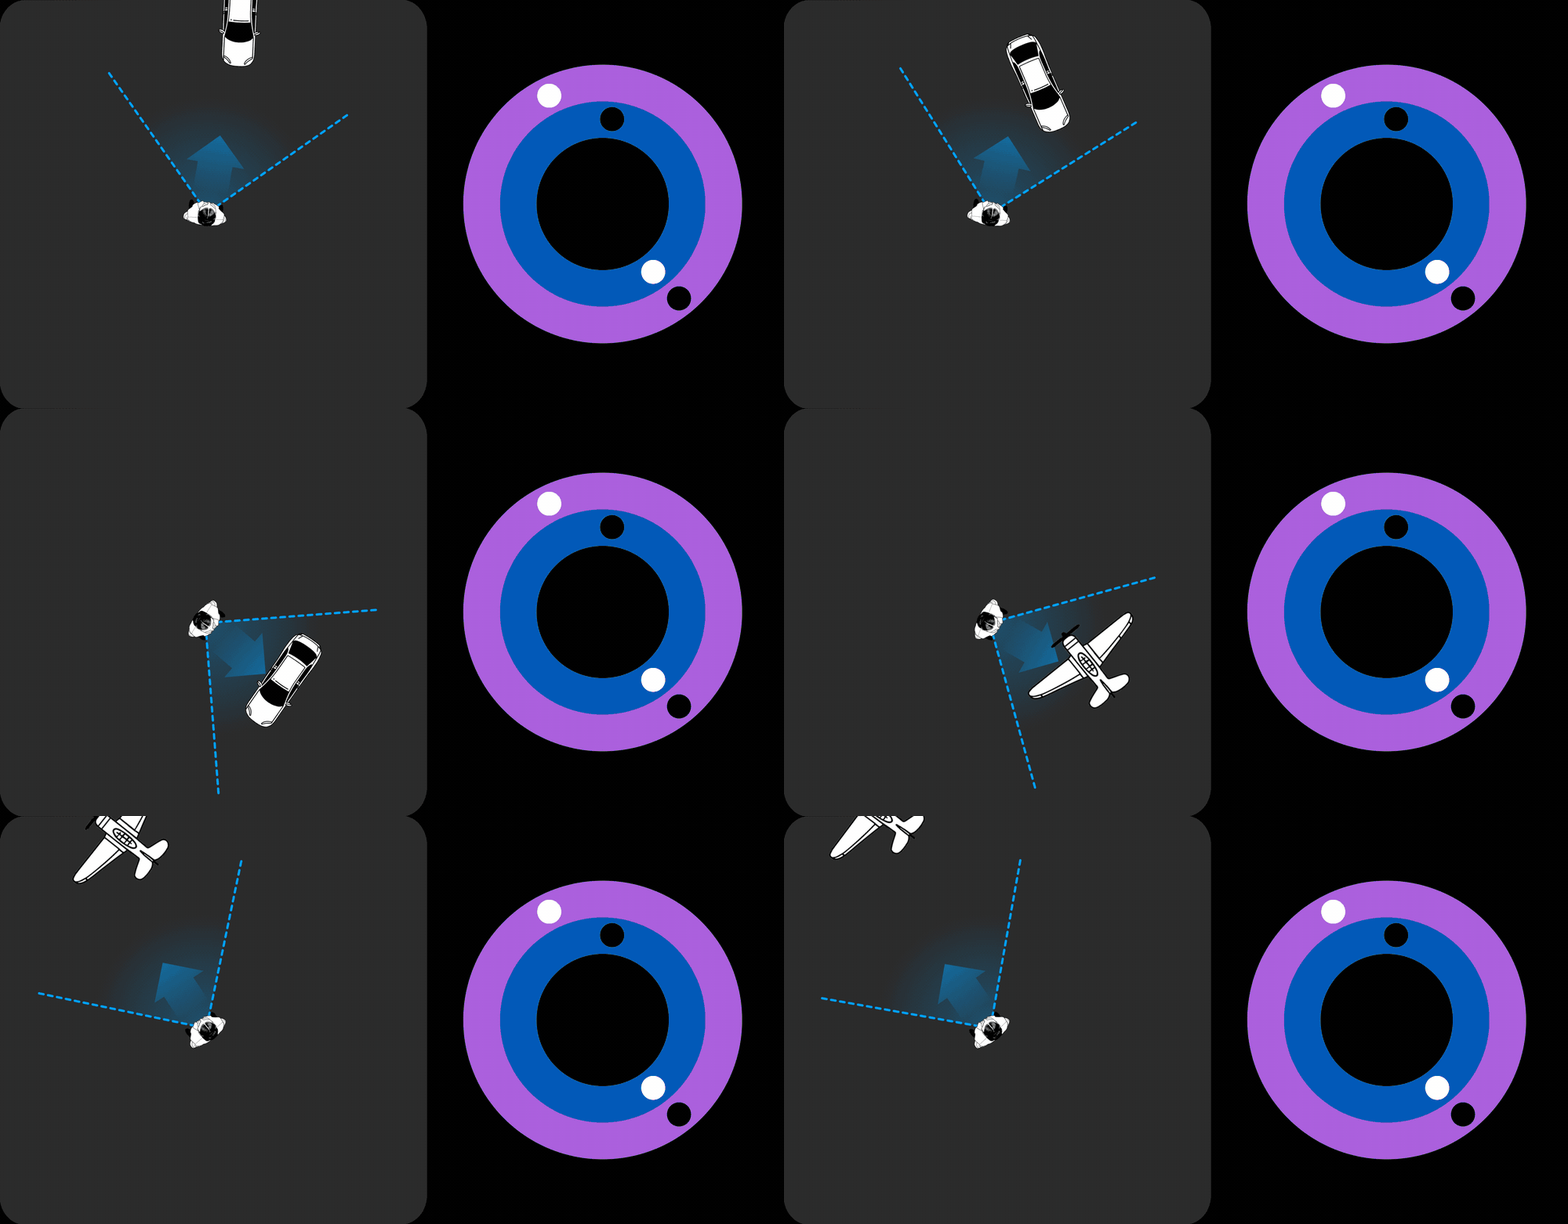
Note we can now easily compare each shot against the last. So that we can see whether the second shot’s focal point position will be in the viewer’s field-of-view when the first shot ends.
Remember our top-down depiction of this same information from earlier? We’ve just recreated it in one image with far less detail but still with the important information.
With the ring diagram (Or Sequence Diagram), we can depict a whole narrative and understand the ramifications of subtle or large focal point changes across each edit.
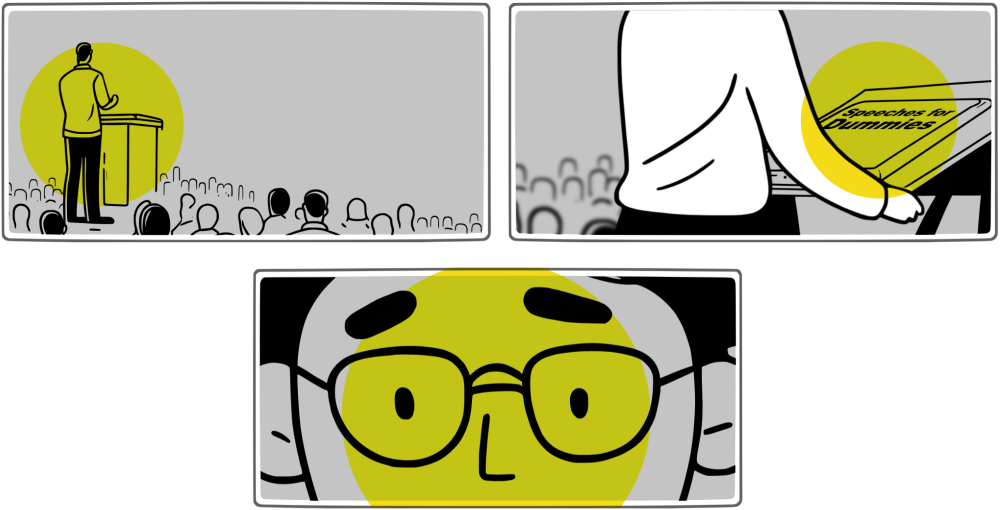
The rings do for immersive media, part of the job that storyboard frames enable for 2D media. In the below 2D media storyboard, the reader can understand that the focal points of the two shots differ. Meaning the viewer will need slightly more time to orient themselves between shots.
Revisiting Brillhart’s example
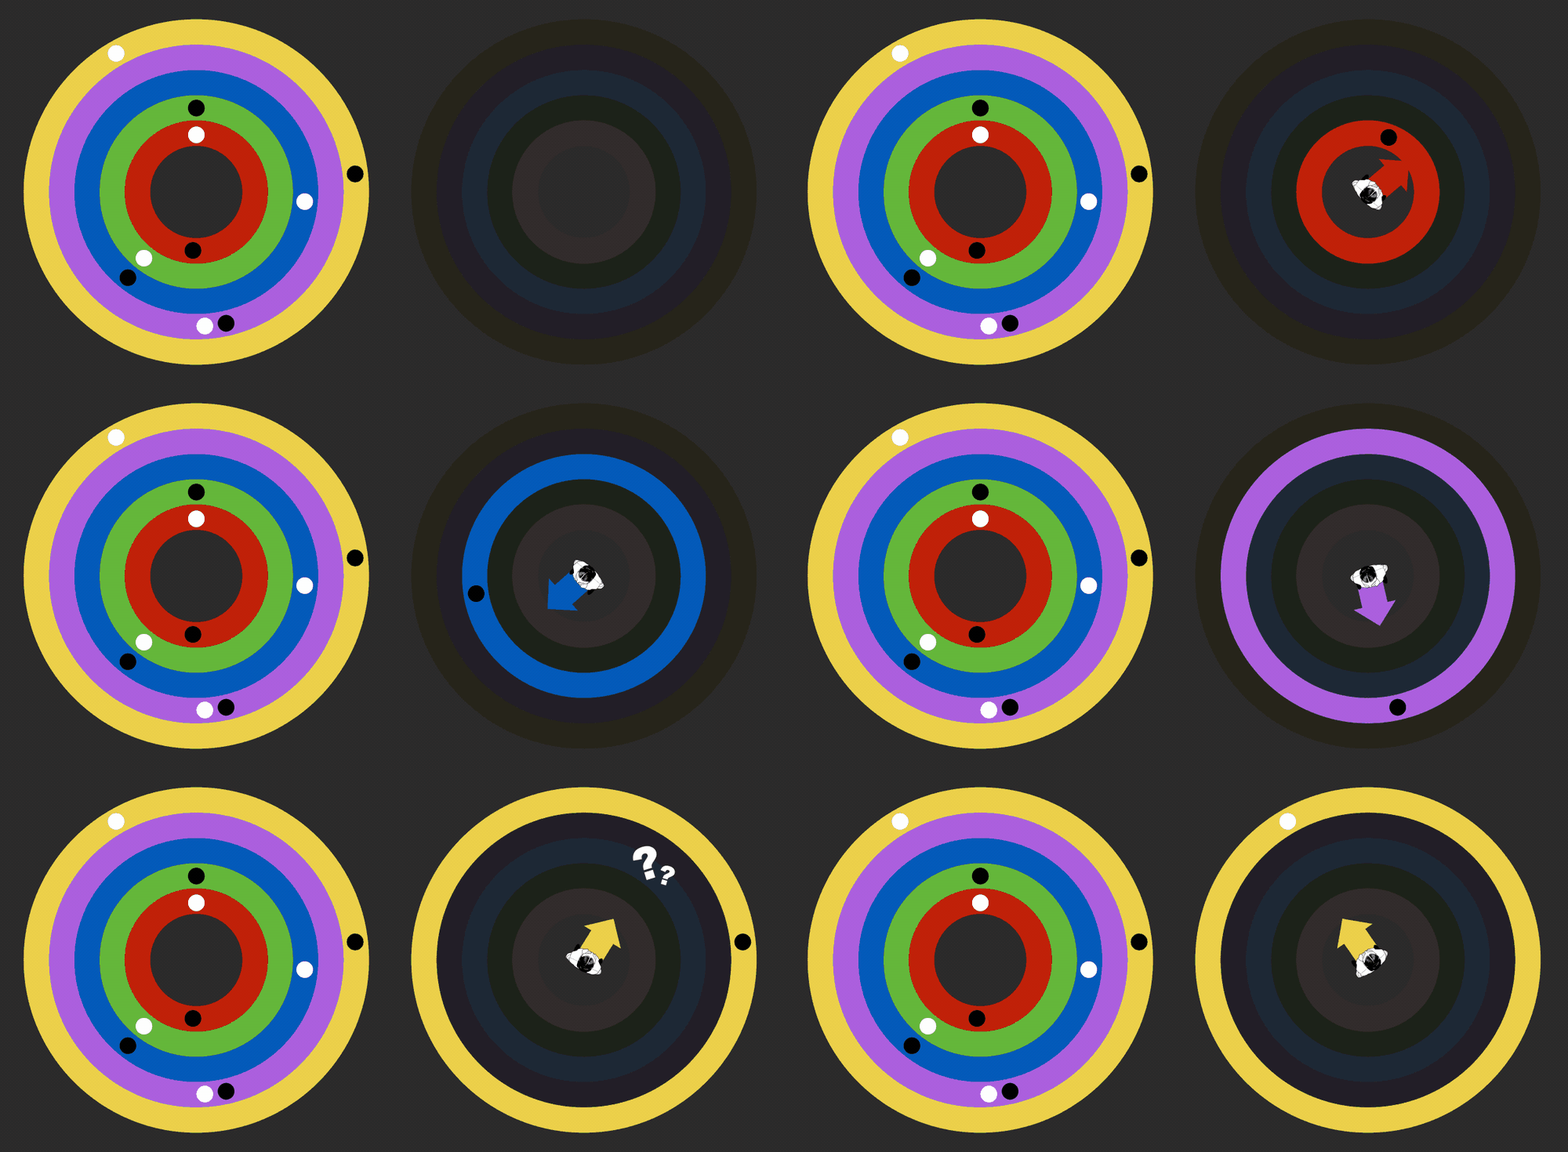
While rereading Jessica Brillhart’s example below (Now that you know what it means), remember to start with the black dot in the centre ring, then follow it to the white dot in the same ring, and then jump to the black dot in the next ring and repeat the process.
You’ll start to see that the edits from from red to green to blue will feel seamless for the viewer, because the focal points are in close proximity. When the shot changes from blue to purple, however, the viewer will be left without an immediate focal point and will have to turn around and explore the scene unguided.
and what it implies about the viewer’s experience (second).
Limiting concerns
While I’ve animated how the viewer might move during each shot above, the static diagram is only concerned with noting each shot’s start and end focal points. It disregards the movement of the focal point within each shot — As that would quickly make the diagram too complicated.
The animation also implies that the focal point is continuous and moves smoothly within each shot, but this is merely to make this example easier to understand. We’ll consider focal point movement within shots in a future article.
By separating concerns like this, we can can create a set of minimal effort artefacts that can easily be used while designing. Artefacts you can knock up in seconds with just a pencil and paper.
Shots, Worlds, & Scenes
I’ve deviated from the terminology that Brillhart used in her own articles here slightly. In her articles, Brillhart refers to these rings as “worlds”. This aligns with a tendency in early VR media for each shot to be a different location (or “world”). Each location’s action was often depicted as one continuous shot, which means shot changes would only occur with entire location (or world) changes.
Modern VR media, however, shows that this limitation is more of a stylistic choice. Shots can change easily within the same world if adequate consideration of the users perspective is considered. This is well demonstrated in works like Reimagined Volume II: Mahal by Michaela Ternasky-Holland.
In this adaptation of Brillhart’s diagram, therefore, I refer to these rings as “shots”, to keep it closer to standard Cinematography terminology.
As with traditional cinematography, subtle rules apply for creating easily interpretable edits. For instance, each shot should be significantly different from the previous shot. This can be through perspective change (ie. camera angle or position) or another kind of appearance change (ie. night vs day, or many characters vs empty scene). If shots are too similar, the edit can create confusion or be distracting.
Of course, whole scene or world changes can also occur, and these should also keep in mind the same considerations to ensure the viewer is as oriented, disoriented, or invited to explore, as desired.
If you build experiences in VR, you may note that tools like Unity or Unreal Engine can let you rotate a whole shot to ensure the new focal point always matches up with the direction the viewer is currently facing (Or purposely doesn’t match up) — A sort of Auto-orienting shot.
This is a powerful technique that could be indicated through this diagram as well, but I haven’t addressed it in detail in this article because it’s less straightforward to describe. It’s also not applicable in mediums like YouTube where that control isn’t possible.
A more accessible diagram
As mentioned in my previous article, the task that led to this series of articles was to create a set of templates that students and other media creators could use to visualise their projects. Jessica Brillhart’s diagram provides a simplified way to document focal point blocking throughout a narrative, however, there are aspects of it that makes it less accessible than it could be.
While the diagram itself will always require some conceptual understanding to interpret it properly, anything that can be made self-evident needed to be to create versatile templates.
Colour
In the original diagrams, a range of colours were used. This is a luxury that works fine for a blog post, however, it isn’t well suited to all the working conditions that you may want to use it in. The diagram is a beautiful simplification that is well suited to rough brainstorming and quick communication, and as such, anyone should be able to draw it quickly, with a single colour pen or pencil, and it should transfer perfectly if photocopied.
Focal point order
The original diagram was also ambiguous regarding focal point order within each shot. Is the black dot first or the white dot? And which order should the rings be read? Inside first or outside.
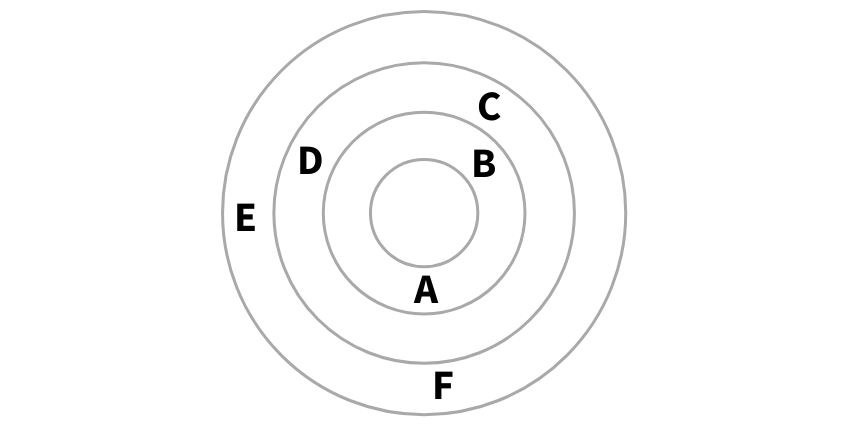
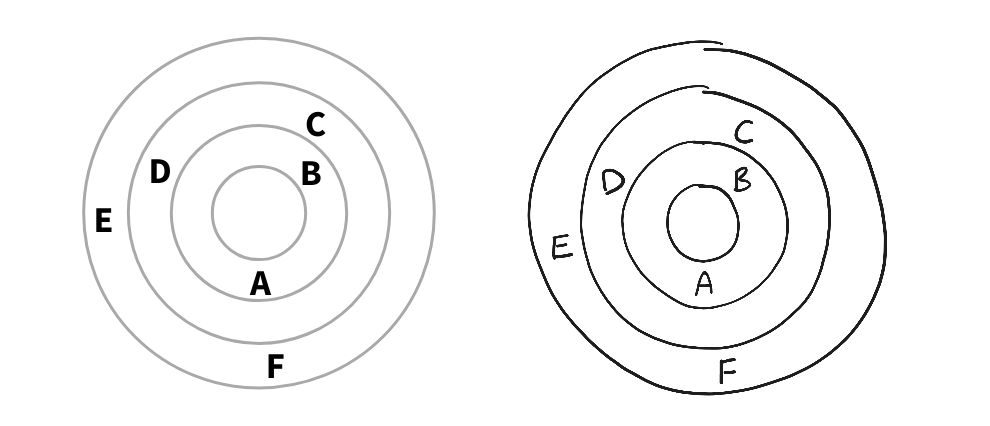
To address both of colour and focal point order, we converted the rings in the diagram to black lines that separated each shot, and the focal points were converted to a series of alphabetically ordered capital letters.
Other considerations
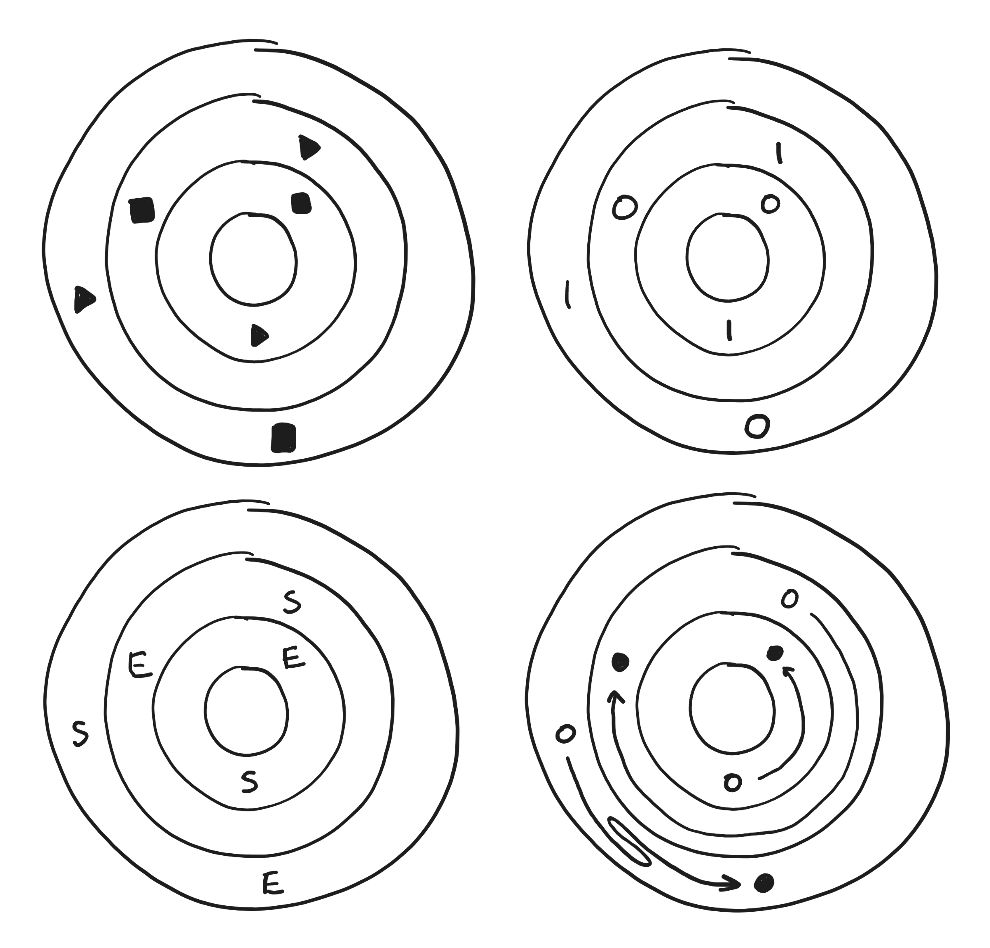
Other abandoned experiments made along the way included the use of icons or letters that would repeat in each shot. These would depict the start or end (or In point or Out point) of each shot.
Due to the lack of colour in rings, however, it became easy to accidentally skip rings while reading the diagram and not realise.
By using a series of capital letters that would increase in alphabetical order, the possibility of missing a ring while reading is reduced, because the reader should know which letter they’re looking for.
Note that letters were used instead of numbers so as to allow the shots (The rings) to be referred to by number without creating confusion.
Usable diagrams and templates
With Jessica Brillhart’s initial diagramming approach and some tweaks to create something more accessible and standardisable, we were able to create templates that media creators could use to block out and storyboard their immersive narratives.
While this Sequence Diagram helps depict focal point transitions between shots, as mentioned it doesn’t help with understanding what happens within each shot. We’ll explore that in the next article and use this diagram within a more holistic template for storyboarding.
Further reading
- For a a short conceptual introduction from Jessica Brillhart on her ring method, read How to Greet a Rebel: Unlocking the Storyteller in VR
- For a more detailed description, read her article In the Blink of a Mind — Prologue
- Reimagined Volume II: Mahal (trailer) by Michaela Ternasky-Holland.
I invite you to subscribe if you’d like to receive this series directly to your inbox and support my writing.
Read Part 3:
Staging XR Scenes
(Keep doing your crappy little drawings)
Thanks…
I dissect and speculate on design and development.
Digging into subtle details and implications, and exploring broad perspectives and potential paradigm shifts.
Check out more like this on Substack or find my latest articles below.
You can also find me on Threads, Bluesky, Mastodon, or X for more diverse posts about ongoing projects.





Leave a Reply